Shopping cart
$0.00
In the last blog post, I told you all about how I went about planning out my quilt and picking my color scheme and fabric.
Now the piecing has begun! Make sure you check out the video where Angelique walks me through my first block, step by step.
In this post, I’ll go over (what I consider to be) the most important things that I’ve learned so far.
When Angelique was teaching me how to maintain the Little Rebel, this was my biggest takeaway. Don’t forget to reference your machine’s manual!
Before I assumed that keeping your machine in working order required the same steps at the same frequency, regardless of the machine you are using. In retrospect, this feels silly, but in case you other beginning quilters out there thought the same thing, I figured I’d share. If you don’t know how often to oil your machine, where to put the oil, or what areas require cleaning, check your manual!
The answer for what your machine needs will be in there. Turns out, it isn’t one size fits all. It will also depend on how much you use your machine, and here’s what I’ve gathered on that front:
Okay, I’m an artist in my free time, and I’ve done my fair share of home DIY projects, so I’m no stranger to rulers, measuring tapes, or squares. Somehow, none of that really mattered when I came face to face with a quilting ruler!
I got pretty intimidated by all of those markings. Angelique knew exactly which lines to reference for each shape and block, but I had to pause and think about what I was cutting. (In the following example I’m using the 12” x 12” TrueCut Ruler.)
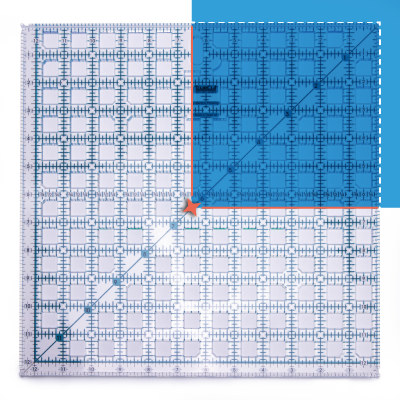
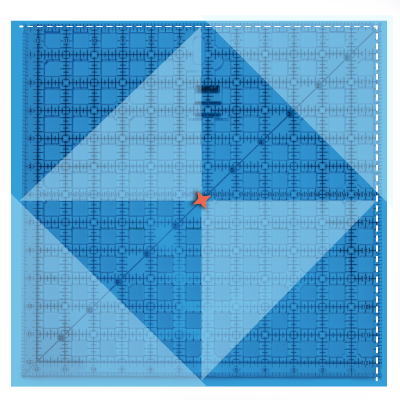
Basically, you have to think about how the cuts you make will impact the resulting block. Much like machine maintenance, it’s not one size fits all.
I don’t really have much advice for this one. It’s something you have to practice and feel for yourself. Still, I thought I’d include it so you know you’re not alone!
At first, I put SO MUCH pressure on the rotary cutter that I broke one… Oops. I think this led to an overcorrection, because then I wasn’t putting nearly enough weight on the rotary cutter. I had to run my cutter over the same line a bunch of times to get all the way through the fabric.
Now that I’ve completed a few blocks, I think I’m getting the hang of the goldilocks standard for how much pressure to apply, and cutting is starting to feel less stressful.
Remember those home DIY projects I mentioned before? I have a confession to make. I tend to be a “that’s probably close enough” kind of person when it comes to certain projects.
This attitude does not translate well to quilting! First, when I was cutting my squares, I had some come out not-quite square (I think due to me stretching my fabric when cutting). Then, when I was sewing, my seams wobbled in and out of the scant quarter inch I was going for. Finally, when I went to press and reveal my final broken dish block, I had a hard time pressing, nesting, and popping my seam because all of my previous steps hadn’t been entirely accurate.
The block still came out okay, but next to the block Angelique completed, it looked messy, and the size didn’t match up exactly. I ended up unpicking all of the sewing you guys saw me do in the video and giving it another, slower, more accurate go, and now my blocks look a lot better.
I’ve still got a long way to go, but I feel like I’m getting the hang of some parts of the process! I hope if you’re quilting along with me, you feel like you’re making some progress too.
I’d love to hear about how your experience making your first quilt block went, so make sure to leave a comment on the video if you’re quilting along! If you have any questions, I’ll be sure to pass those along to Angelique too, so she can help us all out!
For over 25 years the Grace Company has been the leading manufacturer of high quality quilting frames and quilting accessories. What truly sets The Grace Company apart from other competitors is its level of quality, value, and experience toward all their endeavours. From products to external and internal customer experience, the Grace Company responds to market and customer needs and continues to lead the quilting industry. Grace Company frames and hoops are designed to be easy to build and compatible with most major quilting machines. They'll have the quilting product you need.


