How to Bind a Quilt by Machine
The binding of a quilt holds the quilt sandwich together and visually brings all the elements of your quilt top and backing together. Let’s explore the different methods quilters like you use to bind their quilts.
What is Binding?
In quilting, binding is the strip of fabric that covers the raw edges of your quilt top, batting, and backing. This fabric also holds your quilt together, so your quilted patterns don’t come undone over time, and your sandwich doesn’t come apart.
Binding a Quilt with a Sewing Machine
What You’ll Need to Machine Bind a Quilt
· Ruler
· Thread
· Machine
· Pins or Binding Clips
How to Bind a Quilt with a Sewing Machine
1. Determine how much fabric you’ll need for binding
Measure the width and length of your quilt and add these together, then multiply by two to find the total perimeter. If your quilt isn’t rectangular or square, add the length of all sides.
Then, you’ll want to add about 20” to that perimeter to add allowance for the joining seams and corners.
Divide the total perimeter by the usable width of the binding fabric (typically 40”). Then, round up to a whole number to find the number of strips that you need to cut.
If you're trying to determine how much binding fabric to buy, multiply the number of strips by the width of each of your strips. We recommend strips between 2 1/4" and 2 1/2" wide.
Round up a few inches to be extra safe!
If your eyes glazed over reading that, don’t worry. There are plenty of quilt binding calculators out there to do the math for you.
2. Cut your binding fabric into strips
Use a rotary cutter and quilt ruler to measure and cut your strips. To speed up the process, keep your fabric folded with the selvage edges together to cut multiple strips at once.
Cut the selvage edges off all your strips.
3. Sew all the pieces into one continuous strip
While you can use straight seams to connect your strips, using diagonal seams can keeps the bulk down.
How to connect your strips with diagonal seams:
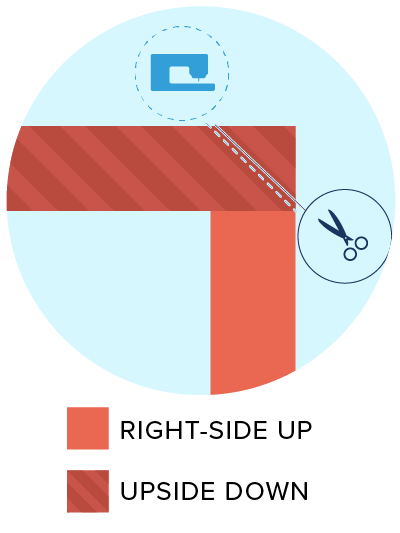
Line up the corners of two of your strips. One should be right-side-up, and the other upside down. Together, these strips should create a right angle.
Sew a line from one corner of the overlapping square to the other at a 45-degree angle.
Cut off the corner.

4. Fold the strip in half
Next, you’ll want to fold the entire strip in half, length-wise. Use your iron to press the fold.
5. Line up your binding with the edge of your quilt
Flip your quilt sandwich so that the backing is face up (you can leave the quilt top face up, but starting with the back gives you a cleaner finish). Starting at the bottom of your quilt, line up the folded binding with the edge of your quilt sandwich. The fold should face in so the raw edges line up with the edge of the quilt sandwich.
6. Start stitching
Leave about 8” of your binding strip unstitched, then, using a ¼” seam allowance, stitch down one side of your quilt.
NOTE: The stitches will show on the back of the quilt, so make sure the thread in your bobbin compliments your binding fabric.
7. Miter the corner
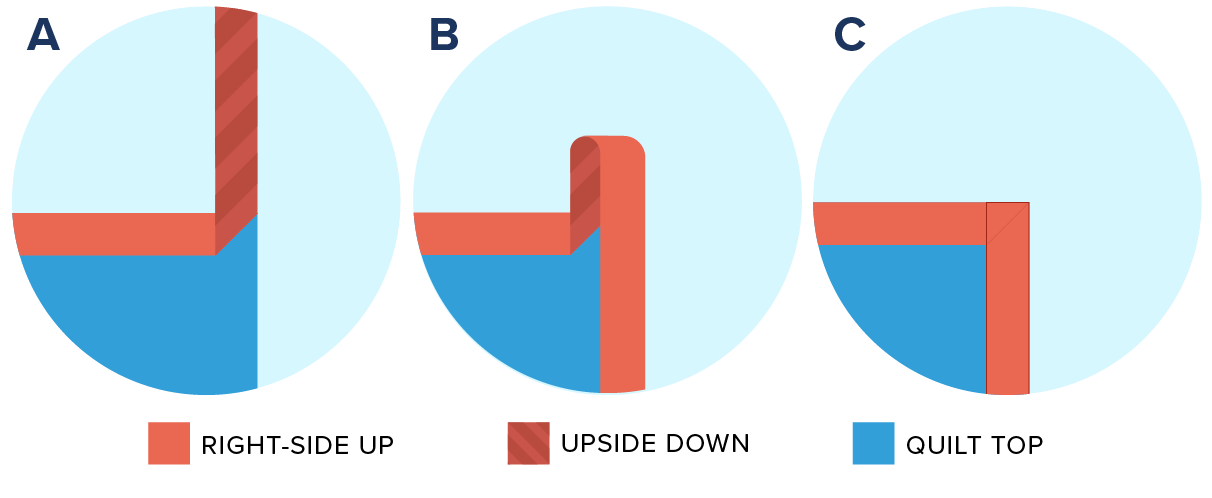
When you’re ¼” away from the corner of your quilt, put your needle down. Rotate the quilt so the corner of the quilt is in the needle’s path.
Sew a line off the corner of your quilt, and cut the thread.
a. Fold the binding over your diagonal seam so that it creates a 90-degree angle with the binding that you’ve already stitched down.
b. Fold the binding again, lining up the fold with the top of your quilt sandwich.
c. The rough edge of your binding should now line up with the next edge of your quilt sandwich.

8. Repeat step 6 & 7 until you reach your starting point
Start sewing right on top of that corner, keeping to the same ¼” seam allowance. Sew all the way down that side of the quilt and repeat the same mitering process when you reach the next corner. You’ll repeat this process until you’ve made your way all the way around the quilt.
9. Join your binding
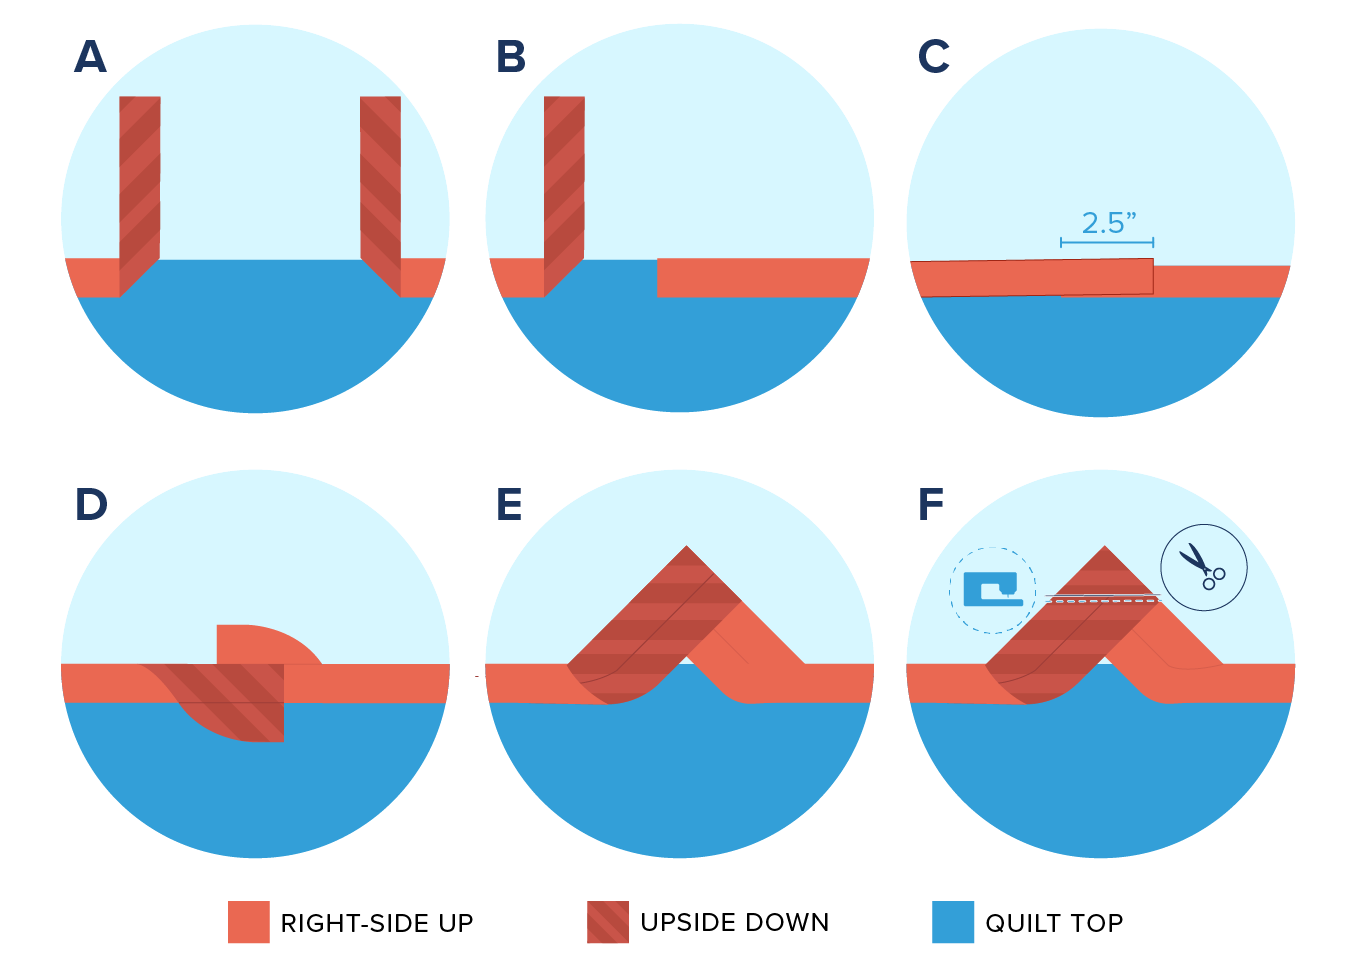
a. Backstitch on either end, leaving a 12”-15” gap.
b. Lay down the binding on the right (where you started your binding) flat against the quilt sandwich.
c. Lay the binding on the left on top of the binding on the right. Cut the binding on the left so the overlap is the same width as your binding strip (2 ¼”-2 ½”).
d. Unfold the binding on the right, so that the fabric is right-side up. Unfold the binding on the left so that the fabric is wrong-side up.
e. Align their corners to make a 90-degree angle and pin, just as you did when making one continuous binding strip earlier.
f. You’ll sew and trim this corner the same way.
Now when you refold the binding, it should form one continuous strip.
Sew the remaining binding.

10. Secure the binding on the quilt top
Flip your quilt over, so now the quilt top is facing up again. Fold the binding over so that it covers the raw edge of the quilt. You can use pins or binding clips to hold down a portion of the binding and sew it down little by little.
TIP: You can use Elmer’s purple glue sticks to hold the fabric down as you sew, if you prefer! The glue comes right off in the washing machine. Ironing the fold over the edge of your quilt sandwich can also keep your binding fabric in place as you’re sewing.
11. Sew down the corners
When you reach a corner, fold it down and hold it in place with a seam ripper as you sew it down. Stitch all the way up to a corner, and then put the needle down.
Rotate the quilt and sew down the next side of the quilt.
How to Bind a Quilt with a Longarm Machine
What You’ll Need to Bind a Quilt on a Longarm
· Ruler
· Thread
· Free Motion Foot
How to Bind a Quilt on a Longarm
Measure out the fabric strips the same way you would binding on a sewing machine, and create one continuous strip. This tutorial picks up after you’ve finished your quilted designs, but you still have your quilt sandwich loaded onto your quilting frame.
1. Reset your quilt for binding
Roll back to the top edge of your quilt sandwich.
Swap to a square foot or a standard free-motion foot.
Your binding should already be folded in half length-wise. Now fold it in half the other way to find its center point.
2. Get your binding in place
Lay out your binding along the top edge of your quilt top. Align the center of the quilt top with the center of your binding.
Line up the raw edges of your binding with the top edge of your quilt and as far as you can down the sides.
3. Miter the corner
Fold your binding so that it creates a 90-degree angle with the binding that you’ve already stitched down. Fold the binding again, lining up the fold with the top of your quilt sandwich.
The rough edge of your binding should now line up with the next edge of your quilt sandwich.
Fold the resulting triangle back and forth to line it up with your binding on both sides.
Move your machine to the upper lefthand corner, so that your needle hovers over the mitered overlap.
Stitch once to pull up the bobbin thread, then move the machine back and forth to stitch over that corner and hold the folds in place.
4. Stitch along the edge of your quilt and miter the next corner
Stitch across the top quilt edge with a ¼” seam allowance.
Secure the next corner using the same method.
Line up the machine above the quilt top and then quilt down the right edge of the quilt, securing the binding.
5. Sew as far down the quilt as you can without rolling
Maintain the ¼” seam allowance as you quilt as far down the right side of the quilt.
Clip the threads and then move the machine over to the left edge of the quilt.
Sew down the binding on that side of the quilt as far as you can.
6. Roll the quilt and continue sewing
Set the needle down.
Advance the quilt through the frame as far as you can.
7. Repeat the processes above
Sew down the binding on both sides of the quilt until you’ve sewn all the way down both the right and left sides of the quilt.
Miter both of the remaining corners.
8. Join the binding on the bottom of the quilt
Use the tuck and fold method to connect the binding at the bottom of the quilt:
Unfold the binding on the left and line up the bottom of the binding with the bottom edge of the quilt top.
Fold a 45-degree angle to create a 90-degree angle with the binding and the bottom of the quilt.
Restore the binding fold over the miter you’ve created.
Lay the binding on the right over the top of the binding on the left. Trim the binding so it reaches about an inch past the mitered spot.
Tuck the binding on the right into the binding on the left.
Stitch along the bottom edge of the quilt until you reach the joining point, then sew back and forth a few times to secure the joining point. Then continue stitching until you’ve finished the binding.
9. Trim the tail left over from the binding on the left side.
Remove the quilt sandwich from the frame.
Finish the binding on the other side with a sewing machine as described above.
You should also hand stitch over the joint, so that it doesn’t come apart.
Posted by The Grace Company
For over 25 years the Grace Company has been the leading manufacturer of high quality quilting frames and quilting accessories. What truly sets The Grace Company apart from other competitors is its level of quality, value, and experience toward all their endeavours. From products to external and internal customer experience, the Grace Company responds to market and customer needs and continues to lead the quilting industry. Grace Company frames and hoops are designed to be easy to build and compatible with most major quilting machines. They'll have the quilting product you need.


