Shopping cart
$0.00
If you’re used to quilting on a traditional sewing machine, using a longarm machine might look a little intimidating. The biggest difference? Instead of guiding your quilt through the machine, you guide the machine over your quilt. It’s a whole new way of quilting—but once you get the hang of it, you’ll find it’s easier in many ways. Longarm quilting is less physically demanding, gives you more control over your designs, and opens a world of creative possibilities for stitching intricate patterns with ease.
In this post, we’ll walk you through how to use a longarm quilting machine featuring Grace Company’s Q’nique 21X Elite longarm machine. The 21X Elite is our top-of-the-line longarm with the furthest reach, the most advanced features, and the best quilting experience.
The first step to quilting on a longarm is the same first step you would take to use a sewing machine. Wind your bobbin and check its tension.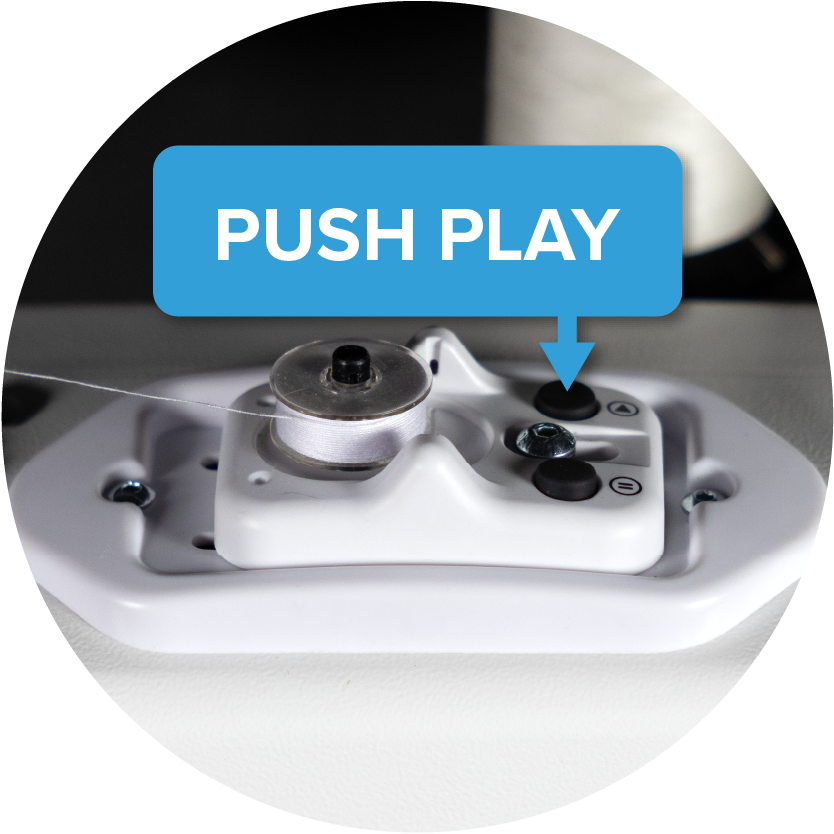
The Q’nique 21X Elite has a built-in bobbin winder. To use it, simply snap your M-Class bobbin onto the bobbin stand, thread the machine as instructed for bobbin winding in the manual, and press the start button.
NOTE: You’ll find that the secret to using any sewing machine or quilting machine is pretty simple: if you aren’t sure how to do something, check the manual.
Next, you’ll place the bobbin in the bobbin case, so that when you pull the thread, the bobbin rotates clockwise.
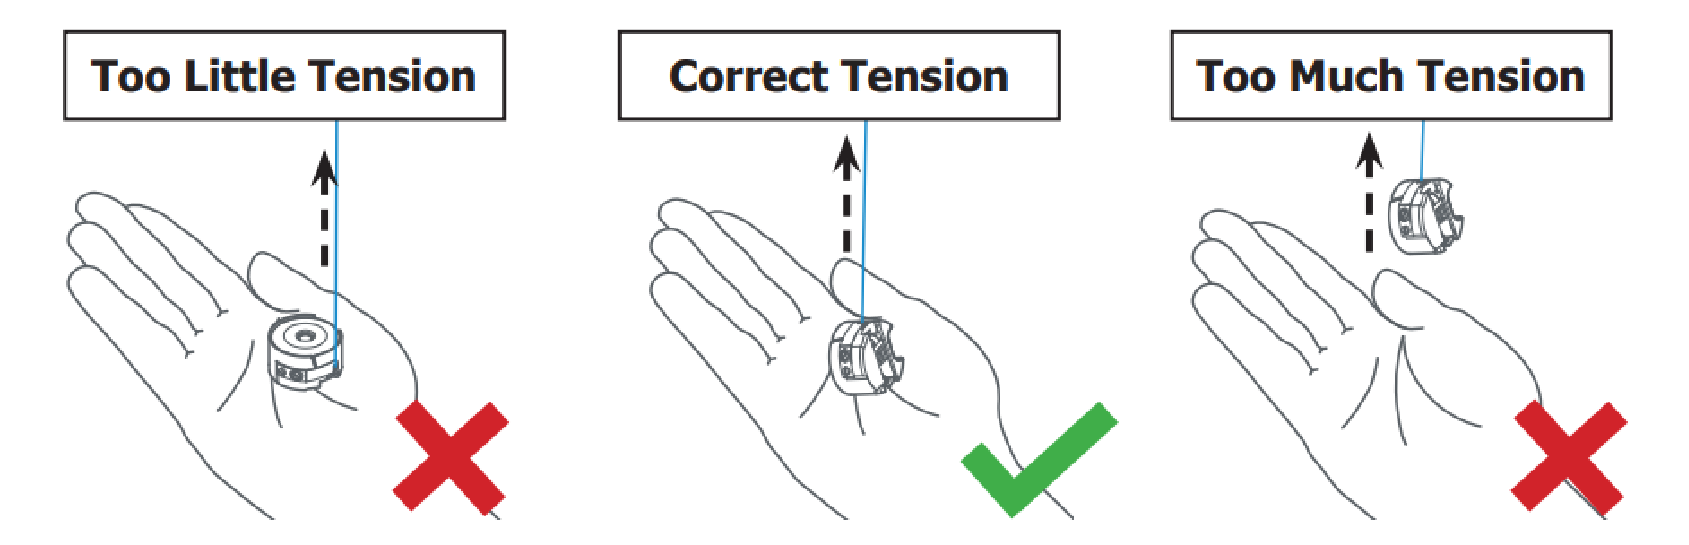
To check the tension, hold the bobbin case in your hand, and pull the thread up. Correct tension will cause the bobbin case to lift onto its side without leaving your hand. If there isn’t enough tension, the bobbin will lay flat on your hand as you pull the thread. If there’s too much tension, the bobbin will lift off of your hand entirely. Adjust the tension by turning the large screw on the bobbin case (clockwise to increase tension, counterclockwise to decrease tension).

Use the on-screen bobbin estimator tool to save the yardage of your bobbin. This tool keeps track of how much thread is left on your bobbin as you quilt. It’s important to input your thread yardage before you start quilting, so you don’t lose a game of bobbin chicken.
An M-Class bobbin holds between 80 and 90 yards of thread, so setting your yardage when your bobbin is full is the best way to get an accurate reading when your bobbin is about to run out.
Simply tap the Toolbox bar to open it, tap on the bobbin estimator tool, name your bobbin, and then set the yardage.
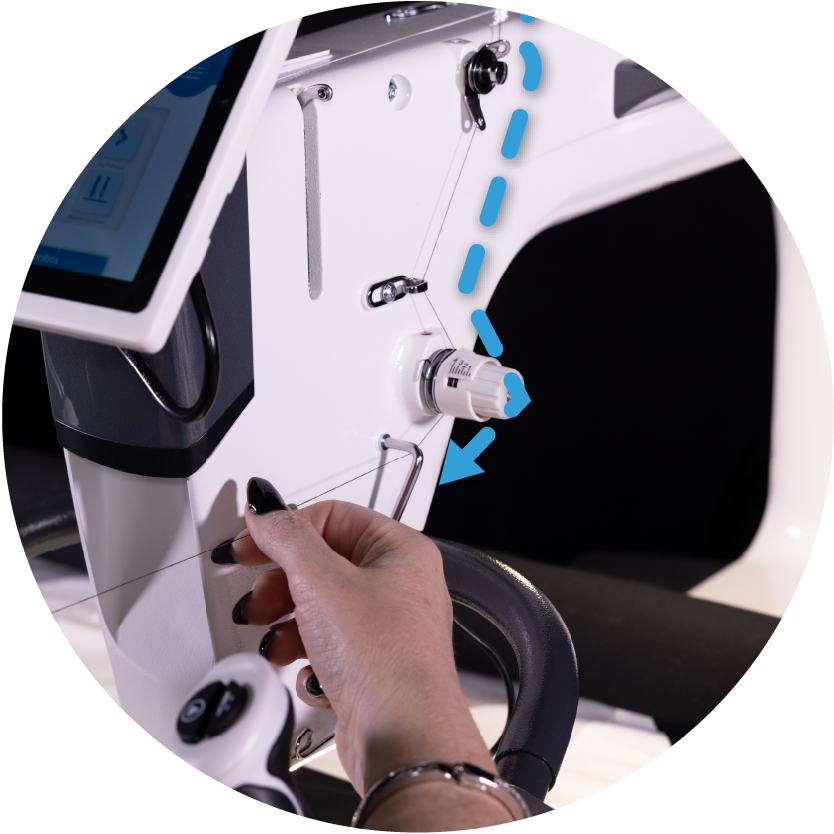
Much like with threading your machine for bobbin winding, it’s best to reference your manual when you thread your machine for quilting.
You can access the 21X Elite’s threading guide directly on the touchscreen display, so it’s easy to feel confident that your machine is threaded correctly or to double check spots you aren’t sure about if your tension isn’t coming out quite right. There’s no need to leave your manual out or to dig it out of a drawer every time you’re starting a new project.
This step will—of course—look a little different depending on what kind of quilting frame you have. If you are looking for a more detailed description of this step, check out our blog post all about how to load different kinds of quilting frames.
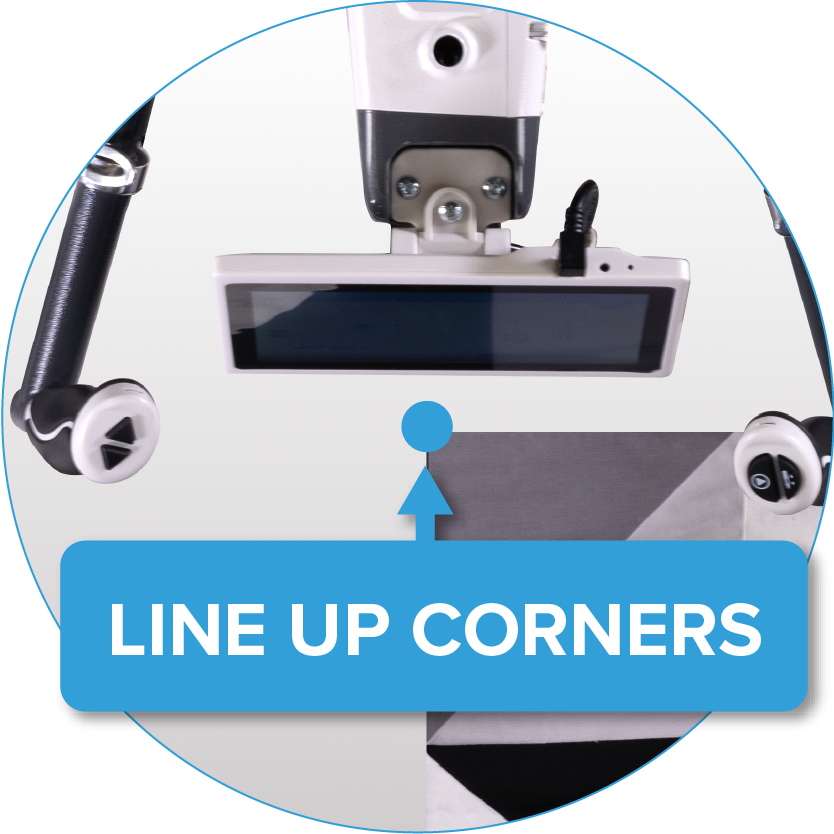
That said, for any quilting frame, knowing where to line up your quilt top on the frame is important. Move your quilting machine as far to the left as it can go, and as far back on the frame as it can go. The place where your needle sits in this position should line up with the top-left corner of your quilt top.
You will also want to ensure that your secured quilt sandwich has the correct amount of tension before you start quilting. If there is too much tension, you’re more likely to break your thread or even your needle while you are quilting. And, if you manage to push through all that breakage, you’ll find that the resulting quilt won’t lay entirely flat once you get it off the frame.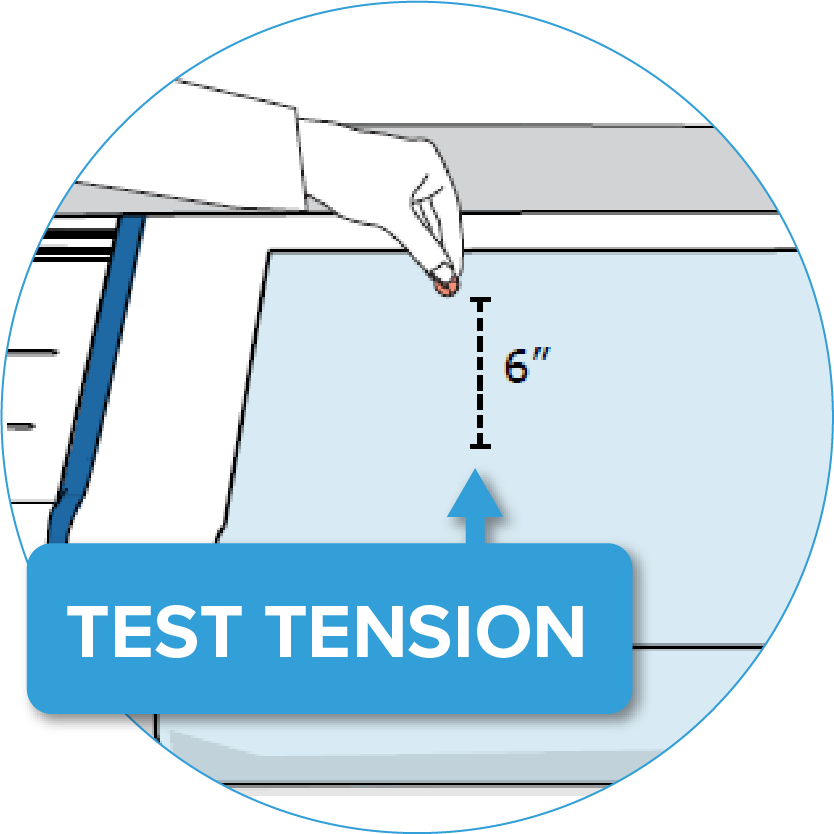
On the flip side, if you don’t have enough tension, you’re more likely to experience folding or puckering fabric as you quilt. This is somewhat manageable if it happens on the quilt top, as you can catch the puckers and folds as you go. However, if it happens to the backing, you won’t be able to see it and correct as necessary, so when you get your quilt off the frame, you’ll have to unpick and restitch in several places.
So, then, how do you make sure that you have the proper tension? We recommend using the penny test. Hold a penny about six inches above your secured quilt sandwich and drop it.
If the penny bounces enough to fully lift off of the fabric, there is too much tension. If the penny does not bounce at all and instead slides down the fabric, there’s not enough tension. If the penny only bounces enough to lift partially off the fabric, the tension is perfect!
Most new longarmers don’t realize that their longarm won’t necessarily be able to reach everywhere on the quilting frame. And even if you do know that, it’s still easy to get carried away while you’re quilting and bump into your longarm’s limits mid-pattern.
 The first step to preventing this problem is to determine your actual quiltable area. To do this, move your longarm as far back and as far left as you can on the frame. If you want, you can mark that location on your quilting frame using tape or markers. Next, move your longarm as far back and as far to the right as you can on the frame. Mark it. Then, to the front-right, then the front-left. Mark those too.
The Q’nique 21X Elite actually has an Edge Warning® tool that lights up and sounds to alert you when you approach the edge of your quiltable area. You set it up much the same way, but instead of marking each corner with tape or marker, you set that point on the screen when prompted.
While some longarm machines only have one stitch mode, others offer a variety of options for different quilting styles. The Q’nique 21X Elite offers four different stitch modes. Let’s go over each one, and what differentiates them, so you can pick the mode that sounds best to you:
Precise - Your needle will only move when you move the machine and maintains stitching size automatically.
Cruise - Continues stitching when you are not moving the machine but still maintains stitching size.
Manual - Stitches at a constant speed. You control the stitch size by moving your machine faster or slower.
To select the stitch mode you want, tap on the dropdown list above the play button on the touchscreen display, then tap the desired stitch mode.
Position your longarm at the top left of your quiltable area and start up your machine! How you actually start the machine will depend on the longarm you are using.
With the 21X Elite, you can either press the big play button on the touchscreen display or the play button on top of the right handle. The machine will begin stitching. Then, it works a lot like drawing on paper with a really, really big pencil. Just hold onto the handles and steer your machine through the desired design.
Once you’ve filled up the entirety of your quiltable area, it’s time to advance your quilt through the frame, so you can quilt the next section.
Rather than moving your longarm and quilt sandwich separately, we recommend putting your needle down and moving them together. That way, you don’t have to worry about finding the spot where you stopped stitching, and you can start back up again seamlessly.
Resecure your quilt on the frame and test your tension again.
Fill the quiltable area with your design. Move the quilt through the frame. Secure again. Repeat the process until you’ve quilted the entire project.
And that’s it! As you’ve seen, once you break it down step by step, using a longarm quilting machine isn’t nearly as complicated as it might seem. In fact, it can actually make quilting easier, more fun, and way more freeing. Whether you’re looking to speed up the quilting you already love or you’re excited to try out new patterns and techniques, longarm quilting opens the door to a whole new world of creative possibilities.
For over 25 years the Grace Company has been the leading manufacturer of high quality quilting frames and quilting accessories. What truly sets The Grace Company apart from other competitors is its level of quality, value, and experience toward all their endeavours. From products to external and internal customer experience, the Grace Company responds to market and customer needs and continues to lead the quilting industry. Grace Company frames and hoops are designed to be easy to build and compatible with most major quilting machines. They'll have the quilting product you need.


