Blog

Our Latest News

How to Make an Economy Block

If you're a beginning quilter, fancy piece-heavy patterns can seem overwhelming and overly-complicated. Hey, even if you're an experienced quilter, using the basics in creative ways with different fabric combinations or intricate longarm quilting designs can still be a worth-while quilting endeavor. We're here to tell you that you don't need to overthink your next quilting project! Getting back to basics with simple, classic block patterns can help you sharpen your quilting skills and give you an attainable project to dive right into. For our first entry into the basic quilting block series, let's look at how to make the economy block. 

Did you know the economy block is so named for its popularity in the Great Depression? This block let resourceful quilters use normally-too-small scraps to create bedding inexpensively.

Prefer to quilt along with a video tutorial? Check out our short video on how to make an economy block!

The Fabric You'll Need to Make an Economy Block

The Economy Block Size Chart Cheat Sheet

The fabric you'll need to make an economy block      Size chart and cheat sheet for required economy block pieces


Step-by-Step Instructions to Sew an Economy Block


Step 1: Cut

  • Use a rotary cutter to cut one of the "C" squares (see the what you'll need graphics above) in quarters. Cut from one corner to the opposite corner so you end up with four equally sized triangles.
     
  • Use a rotary cutter to cut two of the "B” squares in half, diagonally. You’ll end up with four equally sized triangles.

Step 2: Layer

  • Layer one of the resulting C triangles on top of one of the A squares.

Step 3: Sew

  • Sew a .25” seam connecting the C triangle to the A square.
     
  • Cut the thread between the leader and your block as well as the thread between your block and the needle.

Step 4: Layer

  • Layer another C triangle on the opposite side of the A square, ensuring that the longest side of the triangle is aligned with the side of the A square.

Step 5: Sew

  • Sew a .25” seam connecting the C triangle to the A square.
     
  • Cut the thread between the leader and your block as well as the thread between your block and the needle.

Step 6: Press

  • Press the seams on the resulting shape so that both seams face out.

Step 7: Rotate and Layer

  • Rotate the shape and layer the third C triangle on top. Line up the triangle's longest side with the edge of the A square.

Step 8: Sew

  • Sew a .25” seam connecting the C triangle to the A square.
     
  • Cut the thread between the leader and your block as well as the thread between your block and the needle.

Step 9: Layer

  • Layer a fourth C triangle onto the A square, lining it up with the remaining unsewed side of the square.

Step 10: Sew

  • Sew a .25” seam connecting the C triangle to the A square.
     
  • Cut the thread between the leader and your block as well as the thread between your block and the needle.

Step 11: Press

  • Press the seams on the resulting shape so that all of the seams face out.

Step 12: Rotate and Layer

  • Layer one of the triangles from the "B" squares onto the resulting shape, and line up the triangle’s longest side with the edge of the square.

Step 13: Sew

  • Sew a .25” seam connecting the B triangle to the shape
     
  • Cut the thread between the leader and your block as well as the thread between your block and the needle..

Step 14: Layer

  • Repeat on the opposite side of the square, layering and lining up the second B triangle.

Step 15: Sew

  • Sew a .25” seam connecting the B triangle to the shape.
     
  • Cut the thread between the leader and your block as well as the thread between your block and the needle.

Step 16: Press

  • Press the seams out.

Step 17: Rotate and Layer

  • Rotate the resulting shape, and layer another B triangle onto the straight edge of the shape.

Step 18: Sew

  • Sew a .25” seam connecting the B triangle to the shape.
     
  • Cut the thread between the leader and your block as well as the thread between your block and the needle.

Step 19: Layer

  • Layer another B triangle onto the remaining straight edge of the shape.

Step 20: Sew

  • Sew a .25” seam connecting the B triangle to the shape.
     
  • Cut the thread between the leader and your block as well as the thread between your block and the needle.

Step 21: Press

  • Press the seams out.

Step 22: Repeat

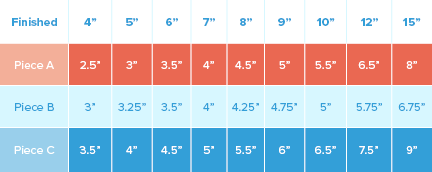
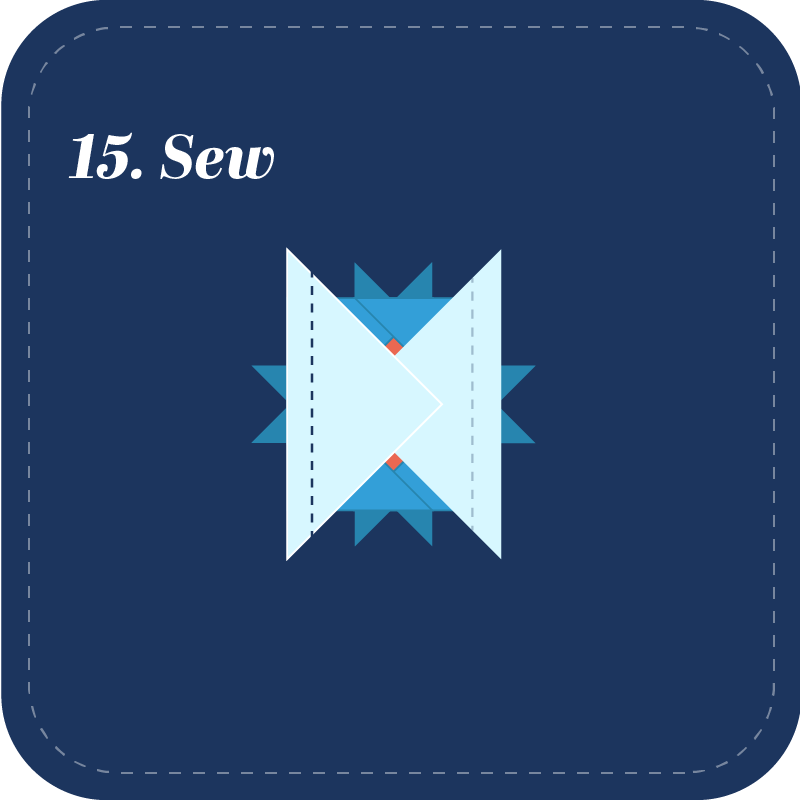
  •  Repeat the entire process three more times, so that you have four pieced squares.


Step 23: Piece

  • Piece the squares together.


And that's all there is to it, Home-Based Quilters! Hopefully this tutorial helps you make something you're really proud of (and gives you an excuse to start a new quilting project!) 

Share this Post:

Posted by The Grace Company

logo

For over 25 years the Grace Company has been the leading manufacturer of high quality quilting frames and quilting accessories. What truly sets The Grace Company apart from other competitors is its level of quality, value, and experience toward all their endeavours. From products to external and internal customer experience, the Grace Company responds to market and customer needs and continues to lead the quilting industry. Grace Company frames and hoops are designed to be easy to build and compatible with most major quilting machines. They'll have the quilting product you need.

Related Posts: