Shopping cart
$0.00
We’re back with another Karla Gerome original design! This quilt strip bag is designed to be constructed from the leftover strips of the fabric or leftover quilt blocks that you have laying around your quilting workspace, but you can absolutely buy fabric for this project if you have a specific color or theme in mind for your bag. There is a great deal of room for creative liberty in this project, from fabric strip color, block pattern, and handle choice. Karla recommends that you separate your extra fabric and quilt blocks into color groupings that appeal to you. We can’t wait to see how you make it your own.
¾ - 1-yard fabric strips
Fabric blocks
1-yard batting
1 ½ yard of inexpensive/plain backing
⅔ yard lining
Handle of your choosing
Handle buckle or cording
Snaps
The visual aid above shows you how to place your strips onto the backing to create the center square as Karla did the video. Remember, you’ll be creating three squares with your quilt blocks or fabric strips. The larger your quilt blocks, the larger your bag will be. It is recommended to keep your blocks in the range of 8”-15”. If they are any larger, the bag will appear out of proportion. Leave an extra 1/2 “ of fabric to the square block size to allow for trimming and squaring the edges as seen in the photo below.
This strip quilt bag is set on-point; to measure the width of your bag, cut a square of paper to set on your fabric square, measure from the left point to the right point as shown below. Now, you’re ready to cut your batting! Cut three batting pieces in the size that you just measured from your fabric square.
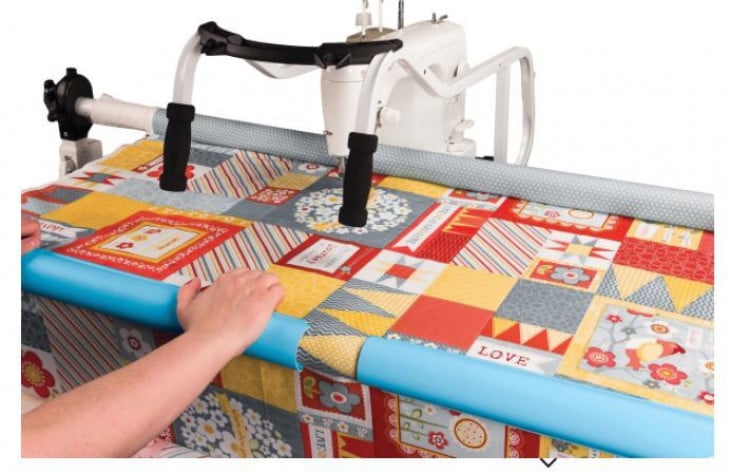
Once you’ve reached this point, you’re ready to place your backing and batting on your frame in the on-point position. Karla recommends that you begin quilting at the center (the widest area of the triangle) and working your way to the tip of the triangle. It is helpful to use your machine’s foot as the guide. The lines don’t have to be perfectly straight, this pattern is extremely forgiving.
PRO TIP: To achieve steadier motion with your quilting machine, Karla advises you to lay the top pole of the frame directly on the base of your quilting machine.
Steady stitching ahead!
To place and sew the strips, follow these steps:
Lay your first strip right side up and sew with your machine,
Lay your next strip with the wrong side facing up and sew a ¼” seam across the first two strips.
Keep working your way across your on-point square with the strips until you have finished strip quilting.
Take it off the frame and cut the excess fabric to reveal your finished square.
PRO TIP: Use the quilt clips to maintain your desired tension. In these videos, Karla is using the Q-Zone Queen frame with various sizes of quilt clips, depending on her needs.
Once you have your square cut from the backing, use a ruler, mat, and rotary cutter to polish the edges of your squares.
It’s all coming together now! Next, we’ll sew our three squares together to create the body of the bag. Turn the block, intended for the middle of the bag, so that the strips are vertical instead of horizontal as they have been sewn (only for the center block, pictured below on the left side).
You’ll begin sewing the horizontal striped squares together, as shown below, with the wrong side facing outward.
Repeat this process with the center square on one of the sides.
The next step is to pin and sew the lining to the strip quilt bag. Unlike the squares, the lining will be pinned and sewed with the face side of the fabric facing outward. Leave about a 12” opening to pull the bag right-side out. Then, pin the lining to the opening with the right sides together. The photo below is how the bag should look with the lining pinned.
Here is the lining sewed and ready to flip right side out.
Pin the 12” opening and sew with a topstitch. Karla sewed the mouth of her bag twice around the perimeter to keep it sturdy.
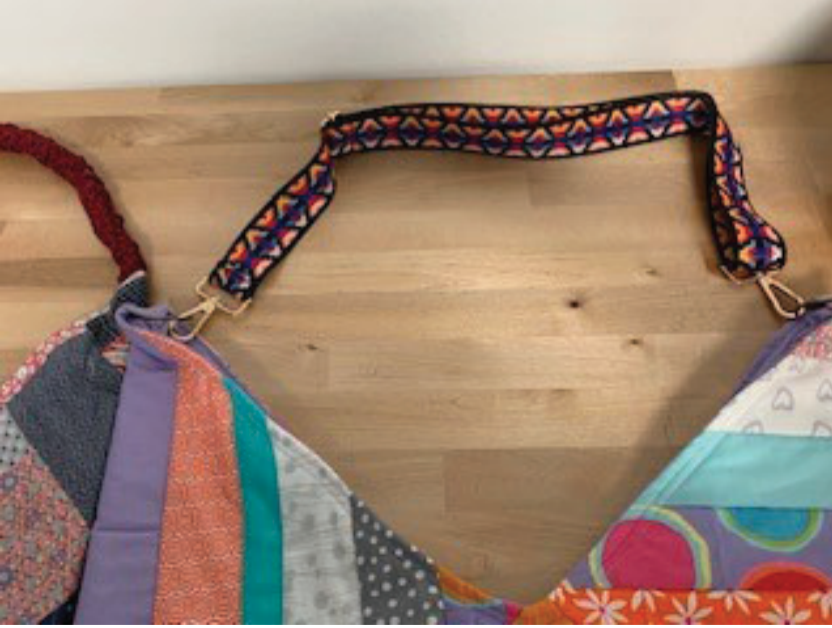
You’re now ready to add the handle to your bag. Below are photos of the cord handle and the handle with buckles. To attach the handle made from a cord, cover the cording with a fabric sleeve and sew the sides. For the handle option with buckles, make loops of your choosing and attach the handle.
The last photo is the final look of the strip quilt bag. What we love about this project is that no bag will look the same. A strip quilt bag is a great, practical gift idea for your loved ones that’s even more meaningful because YOU made it. As Karla says, “Have fun using your fabric scraps, it’s in the BAG!” Thank you for following along. We hope that you’ll post your version of the strip quilt bag in the Quilting With Grace Facebook group.
For over 25 years the Grace Company has been the leading manufacturer of high quality quilting frames and quilting accessories. What truly sets The Grace Company apart from other competitors is its level of quality, value, and experience toward all their endeavours. From products to external and internal customer experience, the Grace Company responds to market and customer needs and continues to lead the quilting industry. Grace Company frames and hoops are designed to be easy to build and compatible with most major quilting machines. They'll have the quilting product you need.